非負値行列因子分解(NMF : Non-negative Matrix Factorization)について
はじめに
以前Qiitaに投稿したものをメモ用にとこちらに移植しました.勉強ついでに少しイジって更新しました. Support Vector Machine (SVM)や最近ではDeep Neural Network (DNN) などが流行っていますが,「こんな手法もありますよ」というのを知ってほしくて書きました.
非負値行列因子分解(Non-negative Matrix Factorization)
NMFは,非負値(>=0)の行列 V を他の2つの非負値な行列 W, Hの積で近似するアルゴリズムです. このアルゴリズム自体は,特徴抽出や自然言語処理,クラスタリング手法として用いられます.
またその非負値性から,音響信号処理におけるパワースペクトルを用いたものもあり,スペクトログラムの中から特定の楽器の音色の発音時刻を見つけるといった使い方もされています.
数式表現
i * jのもと行列に対しての,NMFの数式は,
となる. 入力されてくる行列Vの中身は分かっていますが W と H の要素は不明なので,NMFではこの V と WH の距離を最小化して要素を計算します.
更新アルゴリズム
NMFでよく知られている(そして簡単)なアルゴリズムは,乗法的更新アルゴリズムです. 上でも述べましたが,XとWHの距離(誤差)を定義し,それを最小化しなければなりません. NMFで使われる距離アルゴリズムは私が知っているもので3種類あります.
ユークリッド距離(EUC)
よく使われる距離関数.
一般化カルバック・ライブラー距離(KL)
2つの確率分布の違いをはかる尺度だったりします."距離"というわけではないらしいですが,KLダイバージェンスを最小化することと,尤度の最大化を同じ意味らしいです.
Itakura-Saito距離(IS)
音響処理におけるスペクトルの近似の差を示す尺度らしいです. 知覚的尺度ではないが,知覚的類似性を反映することを意図してるらしい・・・.(wiki参照)
Itakura–Saito distance - Wikipedia
他にもこれら3つの距離関数を表現している,βダイバージェンスなどもあったりします. これらの距離アルゴリズムを乗法的更新アルゴリズムとして使用します. 細かい式の導出や変形は省略します.
変形後の更新式は,
ユークリッド距離(EUC)
一般化カルバック・ライブラー距離(KL)
Itakura-Saito距離(IS)
こんな感じだったかと(間違ってたら申し訳ない). 気をつけないといけないのは,数式の中に入ってるHが{n+1}になっていること! これを忘れると,全く収束しない事態に陥ります. これを反復的に実行することで,V と WH の距離を小さくしていきます..
参考資料・URL
http://papers.nips.cc/paper/1861-algorithms-for-non-negative-matrix-factorization.pdf MIT Press Journals
実装
実際にPythonで実装した例を提示します.
開発環境
Python 2.7.11(Qiitaに挙げてから更新してない・・・)
numpy 1.11.1
cmake 3.6.2
# coding:utf-8

import numpy as np


class NMF():
    """
    簡単なNMFを行うクラス
    """
    def setParam(self, k, row, column):
        """
        :param k
        :param row: 列
        :param column: 行
        :return:
        """
        self.__k = k
        self.__row = row
        self.__column = column

        self.__dictionary = np.random.random_sample([self.__row, self.__k])
        self.__activation = np.random.random_sample([self.__k, self.__column])

    def setDictionary(self, index, data):
        """
        テンプレートありの場合,テンプレートをセットしてください(デフォルトは乱数)
        :param index: どのテンプレートかのindex (0 <= index < k)
        :param data: テンプレートデータ
        :return:
        """
        if index >= self.__k and len(data) != self.__row:
            print "Please NMF.setParam(k,row,column)"
            print "k = " + str(self.__k)
            print "row = " + str(self.__row)
            return

        self.__dictionary[:, index] = np.array(data[:self.__row], np.float32)

    def setAnalyzData(self, data, k):
        """
        一番最初に,このメソッドを呼んでください
        :param data: 分解するデータ
        :param k
        :return:
        """
        if len(np.shape(data)) == 1:
            self.__data = np.ones([np.shape(data)[0], 1], np.float32)
            self.setParam(k, np.shape(data)[0], 1)
        else:
            self.__data = data
            self.setParam(k, np.shape(data)[0], np.shape(data)[1])


    def separate_euc_with_template(self,iter=200):
        """
        テンプレートありのEUC仕様の分離処理を行う
        :param iter:
        :return:
        """
        counter = 0

        while counter < iter:
            approx = np.dot(self.__dictionary , self.__activation)

            wh = np.dot(np.transpose(self.__dictionary) , self.__data)
            wt = np.dot(np.transpose(self.__dictionary) , approx)

            bias = wh/wt
            bias[np.isnan(bias)] = 0

            self.__activation = self.__activation * bias
            counter += 1
        return self.__dictionary,self.__activation


    def separate_euc_without_template(self,iter=200):
        """
        テンプレートなしのEUC仕様の分離処理を行う
        :param iter:
        :return:
        """
        counter = 0

        while counter < iter:
            approx = np.dot(self.__dictionary , self.__activation)

            wh = np.dot(np.transpose(self.__dictionary) , self.__data)
            wt = np.dot(np.transpose(self.__dictionary) , approx)

            bias = wh/wt
            bias[np.isnan(bias)] = 0

            self.__activation = self.__activation * bias

            approx = np.dot(self.__dictionary,self.__activation)
            wh = np.dot(self.__data,np.transpose(self.__activation))
            wt = np.dot(approx,np.transpose(self.__activation))

            bias = wh/wt
            bias[np.isnan(bias)] = 0
            self.__dictionary = self.__dictionary * bias
            counter += 1

        return self.__dictionary,self.__activation
NMF自体を実行するクラスはこんな感じで今回実装しました. 文量の問題で今回は,EUC仕様のものだけを記載しています.
テスト
テスト用のコード(使い方含む)も作ったので実行してみました.
#coding:utf-8

import numpy as np

"""
面倒くさいけれど、この2つをimportしないといけない
"""
from NMF import NMF


"""
テスト用のスクリプト
使い方記載
"""
if __name__ == "__main__":

    """
    基本的にはコンストラクタで面倒なk,row,columnを渡さなくてもOK
    適当に作っただけなので・・・
    """
    nmf = NMF()

    """
    コンストラクタを作ったあとには、まずこれを呼んでください!
    ここで、k,row,columnの設定をするので、これを呼ばないとsetDictionaryが動かなくなります!
    """
    nmf.setAnalyzData([[1,2,3,4],[2,3,4,5]],k=3)

    """
    ここでテンプレートをセットする
    """
    nmf.setDictionary(0,[0.0,2.0])
    nmf.setDictionary(1,[1.0,6.0])
    nmf.setDictionary(2,[11.0,10.0])

    """
    NMF開始
    引数には、アルゴリズムと反復更新回数を渡しておく
    """
    dic,act = nmf.separate_euc_with_template(iter=200)
    # dic,act = nmf.separate_euc_without_template(iter=200)
    """
    結果表示
    """
    print "=========================== Dictionary ==========================="
    print dic
    print "=========================== Activation ==========================="
    print act

    """
    ちゃんと分解できているかの確認
    """
    print "=========================== Approx ==========================="
    print np.dot(dic,act)
このテストでは,
$$ V = \begin{pmatrix} 1 & 2 & 3 & 4\\ 2 & 3 & 4 & 5 \end{pmatrix} \qquad k=3 $$
といった条件の行列に対してNMFを行いました.
この行列に対して,setDictionary()でセットした辞書行列
$$ W = \begin{pmatrix} 0 & 1 & 11 \\ 2 & 6 & 10 \end{pmatrix} $$
を使って,励起行列を更新します.
テスト結果
main.pyスクリプトを実行すると・・・
$ python main.py
=========================== Dictionary ===========================
[[  0.   1.  11.]
 [  2.   6.  10.]]
=========================== Activation ===========================
[[ 0.11776982  0.05902263  0.00976704  0.33375605]
 [ 0.168019    0.20895539  0.24616295  0.1367387 ]
 [ 0.07563464  0.16282224  0.25034882  0.35120557]]
=========================== Approx ===========================
[[ 1.  2.  3.  4.]
 [ 2.  3.  4.  5.]]
ちゃんと,励起行列は更新されて V と WH の距離が0になりました.
ソースコード
今回は省略しました,KL・IS版も含めたものをGitHub上で公開しています. また,今回は紹介を省略したC++版のソースコード(構成はPython版とほぼ同じ)も同様に公開しています.
おわりに
Qiitaに挙げてから随分時間が立って少し忘れていたので,よい復習になりました.
今度は,これを使った実践的な例を紹介しようかなと考えています.
Windows10 + AnacondaでMediaPipe動かしてみた
はじめに
こちらQiitaに公開した記事のバックアップです
ほとんど手を付けられてなかったMediaPipeでしたが、やる気が少し湧いたのでWindows10で動かしてみました。
この記事はWindows10とAnacondaでMediaPipeを動かしたときの備忘録となっております。
MediaPipe自体についてはこちらから確認いただけるとよいと思います。
公式では15個のソリューションがサンプルとして公開されており、今回はPythonに対応している以下6個のソリューションを実装して試してみました。
(本記事とほぼ同じ内容をGithubにあげておりますので、試してみたい方はこちらからどうぞ)
| Face Detection | Face Mesh |
|---|---|
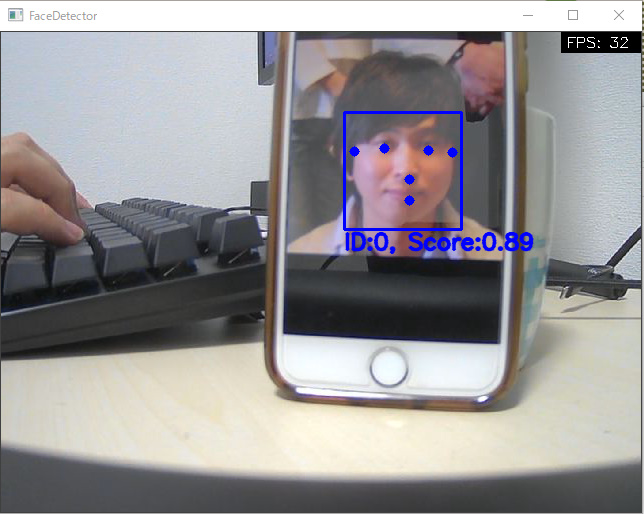 |
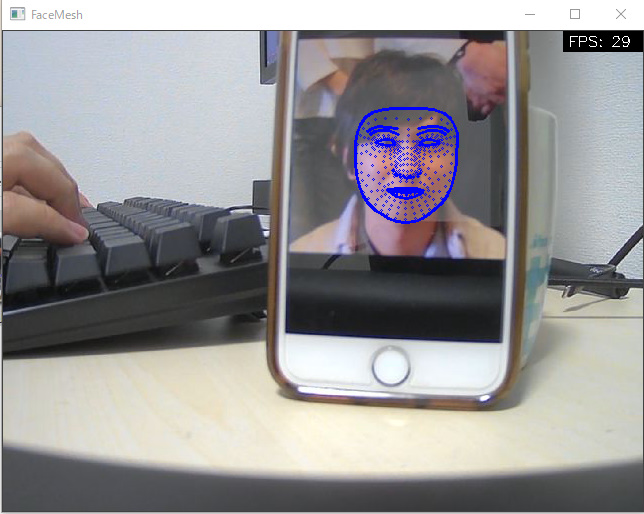 |
| Hands | Pose |
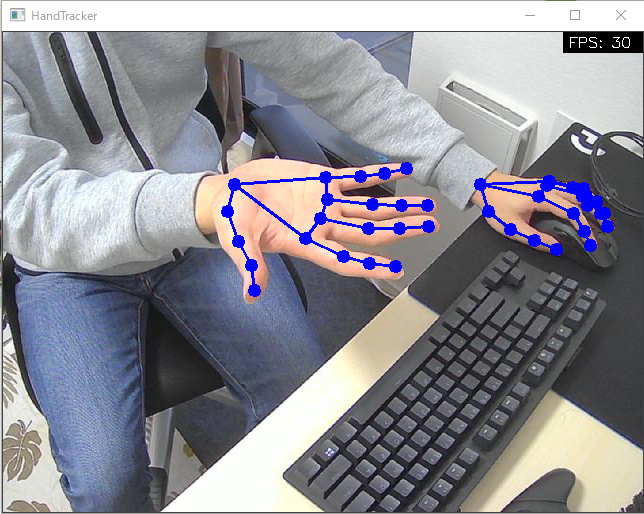 |
 |
| Holistic | Objectron |
 |
 |
開発環境
タイトルにもあるようにWindows10上で開発を行いました。
- Windows 10 home Insider Preview 10.0.21327 build 221327
- Core(TM) i7-9700K CPU @ 3.60GHz
- Anaconda 4.8.2
- Web Camera
環境構築
Anacondaで仮想環境を構築し、その中にMediaPipeをインストールして開発します。
注意)あまりよくないのですがcondaとpipを使ってインストールしています。現状は特に問題は出ていませんが、実施する場合は自己責任でお願いいたします。
(base) $ git clone https://github.com/T-Sumida/mediapipe_python4windows.git
(base) $ conda create -n mediapipe python=3.7
(base) $ conda activate mediapipe
(mediapipe) $ conda install requests
(mediapipe) $ pip install mediapipe, loguru
実装
この記事ではHandsについてのみ記載します。(以下をコピーしただけでは動きませんので、こちらをご確認ください。)
大まかに、「Main」と「FPS計算」「ML」部分に分けて実装しています。
Main部分
main部分では、引数機能とカメラ制御、描画を担当するようにしています。
また、Face Detection以外も扱えるように、argparseのsubpasersを使ってサブコマンドでソリューションを指定できるように作っています。 そのサブコマンド名自体をML部分のクラス名と同一にしておいて、getattr関数でML処理のインスタンスを作成するような形としています。
# -*- coding:utf-8 -*-
import copy
import argparse

import cv2
import numpy as np
from loguru import logger

import models
from utils import FpsCalculator


def get_args() -> argparse.Namespace:
    """引数取得

    Returns:
        argparse.Namespace: 取得結果
    """
    parser = argparse.ArgumentParser()

    parser.add_argument("--device", help='device id', type=int, default=0)
    parser.add_argument("--width", help='capture width', type=int, default=960)
    parser.add_argument(
        "--height", help='capture height', type=int, default=540
    )

    subparsers = parser.add_subparsers(dest="model")

    # hand_tracker command parser
    parser_ht = subparsers.add_parser(
        'HandTracker', help='', description='HandTracker'
    )
    parser_ht.add_argument(
        '--max_num_hands', type=int, default=2, help='最大検出手数'
    )
    parser_ht.add_argument(
        '--min_detection_confidence', type=float, default=0.7,
        help='手検出モデルの最小信頼値 [0.0, 1.0]'
    )
    parser_ht.add_argument(
        '--min_tracking_confidence', type=float, default=0.5,
        help='ランドマーク追跡モデルの最小信頼値 [0.0, 1.0]'
    )

    args = parser.parse_args()
    return args


def draw_fps(image: np.ndarray, fps: int) -> np.ndarray:
    """fpsを描画する

    Args:
        image (np.ndarray): ベースイメージ
        fps (int): FPS

    Returns:
        np.ndarray: 描画済みイメージ
    """
    width = image.shape[1]

    cv2.rectangle(image, (width-80, 0), (width, 20), (0, 0, 0), -1)
    cv2.putText(image, "FPS: " + str(fps), (width-75, 15), cv2.FONT_HERSHEY_SIMPLEX,
                0.5, (255, 255, 255), 1)
    return image


def main() -> None:
    """メインループ"""
    args = get_args().__dict__

    # setting camera device
    cap = cv2.VideoCapture(args['device'])
    cap.set(cv2.CAP_PROP_FRAME_WIDTH, args['width'])
    cap.set(cv2.CAP_PROP_FRAME_HEIGHT, args['height'])
    del args['device'], args['width'], args['height']

    # setting detector
    try:
        model_name = args['model']
        del args['model']
        detector = getattr(models, model_name)(**args)
    except Exception as e:
        logger.error(e)
        exit(1)

    # setting fps calculator
    calculator = FpsCalculator()

    # main loop
    while cap.isOpened():
        ret, image = cap.read()
        if not ret:
            break

        image = cv2.flip(image, 1)
        tmp_image = copy.deepcopy(image)
        image = cv2.cvtColor(image, cv2.COLOR_BGR2RGB)

        if detector.detect(image):
            tmp_image = detector.draw(tmp_image)

        fps = calculator.calc()
        tmp_image = draw_fps(tmp_image, fps)
        cv2.imshow(model_name, tmp_image)

        if cv2.waitKey(1) & 0xFF == ord('q'):
            break
    return


if __name__ == "__main__":
    main()
FPS計算部分
この処理に関しては、以下ページを参考にさせていただきました。(ありがとうございます!)
# -*- coding:utf-8 -*-
from timeit import default_timer as timer


class FpsCalculator():
    def __init__(self) -> None:
        """Initial"""

        self.frame_count = 0

        self.accum_time = 0
        self.curr_fps = 0
        self.prev_time = timer()
        self.result_fps = 0

    def calc(self) -> int:
        """calc fps

        Returns:
            int: current fps
        """
        # update frame count
        self.frame_count += 1

        # update fps
        self.__curr_time = timer()
        self.__exec_time = self.__curr_time - self.prev_time
        self.prev_time = self.__curr_time
        self.accum_time = self.accum_time + self.__exec_time
        self.curr_fps = self.curr_fps + 1
        if self.accum_time > 1:
            self.accum_time = self.accum_time - 1
            self.result_fps = self.curr_fps
            self.curr_fps = 0

        return self.result_fps
ML部分
以下のようなクラス設計にし、他のソリューションを追加した場合も簡単に拡張できるようにしております。
Python版MediaPipeの扱い方に関しては以下を参考にしております。
https://google.github.io/mediapipe/solutions/face_detection.html
かなり簡単に実装ができて、モデルロード・推論・結果取得がすごく簡単でした。(コメントで★を入れている箇所)
結果取得に関しては、試すソリューションによって少し異なりますが公式に分かりやすく載っているので、非常に良かったです!
# -*- coding:utf-8
import cv2
import numpy as np
import mediapipe as mp
from loguru import logger

from .abst_detector import AbstDetector


class HandTracker(AbstDetector):
    def __init__(self, max_num_hands: int, min_detection_confidence: float, min_tracking_confidence: float) -> None:
        """初期化処理

        Args:
            max_num_hands (int): 最大検出手数
            min_detection_confidence (float): 手検出モデルの最小信頼値
            min_tracking_confidence (float): ランドマーク追跡モデルからの最小信頼値
        """
        # モデルロード★
        self.tracker = mp.solutions.hands.Hands(
            max_num_hands=max_num_hands,
            min_detection_confidence=min_detection_confidence,
            min_tracking_confidence=min_tracking_confidence,
        )

    def detect(self, image: np.ndarray) -> bool:
        """手検出処理

        Args:
            image (np.ndarray): 入力イメージ

        Returns:
            bool: 手が検出できたか
        """
        try:
            # 推論処理★
            self.results = self.tracker.process(image)
        except Exception as e:
            logger.error(e)
        return True if self.results.multi_hand_landmarks is not None else False

    def draw(self, image: np.ndarray) -> np.ndarray:
        """処理結果を描画する

        Args:
            image (np.ndarray): ベースイメージ

        Returns:
            np.ndarray: 描画済みイメージ
        """
        base_width, base_height = image.shape[1], image.shape[0]
        for hand_landmarks, handedness in zip(self.results.multi_hand_landmarks, self.results.multi_handedness):

            landmark_buf = []

            # 結果取得★
            # keypoint
            for landmark in hand_landmarks.landmark:
                x = min(int(landmark.x * base_width), base_width - 1)
                y = min(int(landmark.y * base_height), base_height - 1)
                landmark_buf.append((x, y))
                cv2.circle(image, (x, y), 3, (255, 0, 0), 5)

            # connection line
            for con_pair in mp.solutions.hands.HAND_CONNECTIONS:
                cv2.line(image, landmark_buf[con_pair[0].value],
                         landmark_buf[con_pair[1].value], (255, 0, 0), 2)

        return image
デモ
実際にHandsを使ったデモを動画として残しております。
おわりに
今回はMediaPipe公式が提供しているPython版ソリューションをWindows+Anacondaで試してみました。
本当はWSL2上で動かしてみたかったのですが、私の環境ではまだWebカメラは認識してくれなかったため断念しました...
今後は提供されたソリューションで遊ぶのではなく、自分でMLパイプラインを構築して試してみたいと考えております。
wsl2にminikube
はじめに
少しローカルでk8sを試してみたくて今更ながらWSL2にminikube入れてみました。
また忘れてしまいそうなので、備忘録としてインストール手順のメモを残します。
環境
- Windows10 home
- version: 2004
- OSビルド:20279.1
- WSL2
- Docker
WSL2のインストール
公式ページの手順を参考にインストールしました。
Dockerのインストール
WSL2内で以下コマンドを実行し、インストールしました。
(自分は以前にCUDA on WSL2を試すときにDockerを入れたため、若干コマンドがうろ覚えですが以下でよかった気がします...)
$ curl https://get.docker.com | sh
minikubeのインストール
基本的には公式ページの手順に沿ってインストールしました。
# バイナリをダウンロード
$ curl -Lo minikube https://storage.googleapis.com/minikube/releases/latest/minikube-linux-amd64 \
  && chmod +x minikube

# Minikube実行可能バイナリをパスに追加
$ sudo mkdir -p /usr/local/bin/
$ sudo install minikube /usr/local/bin/
kubectlのインストール
どうせ使うので、ついでにkubectlもインストールしておきます。 こちらも例にもれず、公式ページの手順に沿っていインストールしました。
# 最新版のバイナリをダウンロード
$ curl -LO "https://storage.googleapis.com/kubernetes-release/release/$(curl -s https://storage.googleapis.com/kubernetes-release/release/stable.txt)/bin/linux/amd64/kubectl"

# バイナリを実行可能にして、実行パス内に放り込む
$ chmod +x ./kubectl
$ sudo mv ./kubectl /usr/local/bin/kubectl
動作確認
さっそくminikubeを起動させてみます。
# dockerを起動(これをやっておかないと、以下コマンドでエラーが出てくる)
$ sudo service docker start

# minikubeをdocker上で起動(割り当てメモリーを制御したければ、--memory=8gとかで設定する)
$ minikube start --vm-driver=docker
😄  minikube v1.16.0 on Ubuntu 18.04
✨  Using the docker driver based on existing profile
👍  Starting control plane node minikube in cluster minikube
🏃  Updating the running docker "minikube" container ...
🐳  Preparing Kubernetes v1.20.0 on Docker 20.10.0 ...
🔎  Verifying Kubernetes components...
🌟  Enabled addons: storage-provisioner, default-storageclass
🏄  Done! kubectl is now configured to use "minikube" cluster and "default" namespace by default

# kubectlでkubernetesのAPIをたたいてみる
$ kubectl get node
NAME       STATUS   ROLES                  AGE   VERSION
minikube   Ready    control-plane,master   52m   v1.20.0

# docker上で確認する
$ docker ps -a
CONTAINER ID        IMAGE                                           COMMAND                  CREATED             STATUS              PORTS                                                                                                      NAMES
0455498d5d7d        gcr.io/k8s-minikube/kicbase:v0.0.15-snapshot4   "/usr/local/bin/entr…"   53 minutes ago      Up 53 minutes       127.0.0.1:32771->22/tcp, 127.0.0.1:32770->2376/tcp, 127.0.0.1:32769->5000/tcp, 127.0.0.1:32768->8443/tcp   minikube
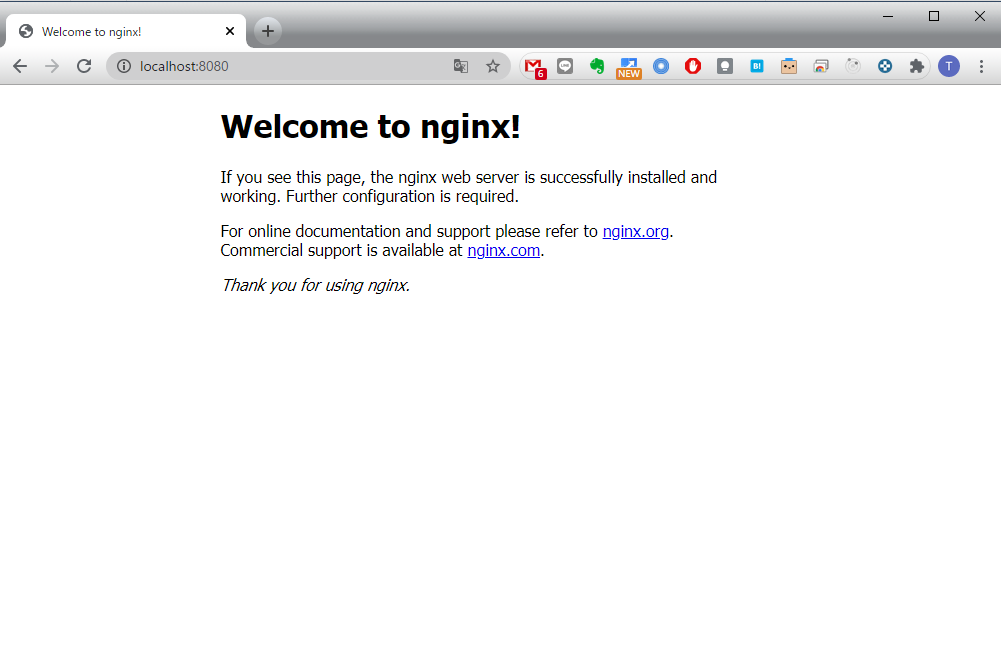
お試しにnginxのPodも作ってみようと思います。
apiVersion: apps/v1
kind: Deployment
metadata:
  name: nginx
spec:
  selector:
    matchLabels:
      app: nginx
  replicas: 1
  template:
    metadata:
      labels:
        app: nginx
    spec:
      containers:
      - name: nginx
        image: nginx:1.14.2
        ports:
        - containerPort: 80
$ kubectl apply -f sample_nginx.yaml
deployment.apps/nginx created
$ kubectl expose deploy/nginx --port=80
service/nginx exposed
$ kubectl port-forward svc/nginx 8080:80
Forwarding from 127.0.0.1:8080 -> 80
Forwarding from [::1]:8080 -> 80
Handling connection for 8080
これでlocalhost:8080にアクセスしてみると、以下のような画面が表示されるかと思います。
最後に、使い終わったPodの掃除をしておきます。
$ kubectl delete deployment nginx
$ kubectl delete svc nginx
おわりに
今回は、自宅のWindows PCにminikubeをインストールしてサンプルを少し動かしてみました。
私自身がMLエンジニアなので、今後はMLに関わるところでminikubeを使って色々試したいと考えています。
FastAPIとTensorflowで簡単な画像認識APIを作ってみた
はじめに
本記事はQiitaの記事のバックアップです。
普段Flaskをよく使いますが、「FastAPIはいいぞ!」と知人に進められたので簡単な画像認識APIを作って見ようと思いました。 しかし、あまりFastAPIとMLの日本語記事を見かけなかったので、メモ代わりに本記事を作成することにしました!
本記事では、開発環境を整えた後、APIサーバとフロントエンドの簡単な説明を記載しております。
今回使用したコードはすべてGithubに公開しています。 (以下実装のフォルダ構成などはGithubを前提に記載しています。サンプルモデルのダウンロードについてもREADME.mdに記載しています。)
FastAPIとは?
かんたんな概要と使い方のまとめは、以下の記事を参照していただけると良いと思います。(本記事でも大変お世話になりました、ありがとうございます!!)
もっと詳しく知りたい方は、FastAPIの公式チュートリアルが充実しておりオススメです!
画像認識について
今回は時間がなかったため、tensorflow.kerasのモデルを使って構築します!
具体的には、imagenetで学習されたResNet50をそのまま利用し、入力画像を1000クラスのどれに属するかを推論することとします。
(本当に使いたかったモデルは、只今絶賛学習中で間に合わなかった...)
https://www.tensorflow.org/versions/r1.15/api_docs/python/tf/keras?hl=ja
開発環境
Mac OS X Mojave Python3.7.1(Anaconda)
環境構築
必要なPythonライブラリをインストールします。
$pip install tensorflow==1.15
$pip install fastapi
$pip install uvicorn
以下のような条件があることから、それに必要なライブラリもインストールします。 - index.htmlをRenderする - 画像ファイルをアップロードする - 画像を読み込み、リサイズする
$pip install Jinja
$pip install aiofiles
$pip install python-multipart
$pip install opencv-python
APIサーバ
APIサーバの実装は以下のようになりました。
# -*- coding: utf-8 -*-
import io
from typing import List

import cv2
import numpy as np
import tensorflow as tf
from tensorflow.keras.applications.resnet50 import decode_predictions
from fastapi import FastAPI, Request, File, UploadFile
from fastapi.staticfiles import StaticFiles
from fastapi.templating import Jinja2Templates

# 画像認識モデルの用意
global model, graph
graph = tf.get_default_graph()
model = tf.keras.models.load_model("./static/model/resnet_imagenet.h5")

# FastAPIの用意
app = FastAPI()

# static/js/post.jsをindex.htmlから呼び出すために必要
app.mount("/static", StaticFiles(directory="static"), name="static")

# templates配下に格納したindex.htmlをrenderするために必要
templates = Jinja2Templates(directory="templates")


def read_image(bin_data, size=(224, 224)):
    """画像を読み込む

    Arguments:
        bin_data {bytes} -- 画像のバイナリデータ

    Keyword Arguments:
        size {tuple} -- リサイズしたい画像サイズ (default: {(224, 224)})

    Returns:
        numpy.array -- 画像
    """
    file_bytes = np.asarray(bytearray(bin_data.read()), dtype=np.uint8)
    img = cv2.imdecode(file_bytes, cv2.IMREAD_COLOR)
    img = cv2.cvtColor(img, cv2.COLOR_BGR2RGB)
    img = cv2.resize(img, size)
    return img


@app.post("/api/image_recognition")
async def image_recognition(files: List[UploadFile] = File(...)):
    """画像認識API

    Keyword Arguments:
        files {List[UploadFile]} -- アップロードされたファイル情報 (default: {File(...)})

    Returns:
        dict -- 推論結果
    """
    bin_data = io.BytesIO(files[0].file.read())
    img = read_image(bin_data)
    with graph.as_default():
        pred = model.predict(np.expand_dims(img, axis=0))
        result_label = decode_predictions(pred, top=1)[0][0][1]
        return {"response": result_label}


@app.get("/")
async def index(request: Request):
    return templates.TemplateResponse("index.html", {"request": request})
フロントからデータを受け取る
@app.post("/api/image_recognition")
async def image_recognition(files: List[UploadFile] = File(...)):
    """画像認識API

    Keyword Arguments:
        files {List[UploadFile]} -- アップロードされたファイル情報 (default: {File(...)})

    Returns:
        dict -- 推論結果
    """
    bin_data = io.BytesIO(files[0].file.read())
    img = read_image(bin_data)
    with graph.as_default():
        pred = model.predict(np.expand_dims(img, axis=0))
        result_label = decode_predictions(pred, top=1)[0][0][1]
        return {"response": result_label}
今回は、FastAPIのUploadFileを使用してPOSTされる画像を取得しております。
bin_data = io.BytesIO(files[0].file.read())
ファイルは一つしかPOSTされないのでfiles[0]としており、フロント側からBASE64形式で渡されるのでAPI側でBytes配列に変換しました。
データを画像に変換する
def read_image(bin_data, size=(224, 224)):
    """画像を読み込む

    Arguments:
        bin_data {bytes} -- 画像のバイナリデータ

    Keyword Arguments:
        size {tuple} -- リサイズしたい画像サイズ (default: {(224, 224)})

    Returns:
        numpy.array -- 画像
    """
    file_bytes = np.asarray(bytearray(bin_data.read()), dtype=np.uint8)
    img = cv2.imdecode(file_bytes, cv2.IMREAD_COLOR)
    img = cv2.cvtColor(img, cv2.COLOR_BGR2RGB)
    img = cv2.resize(img, size)
    return img
opencvの力を借りて、Byte配列からuint8の画像に変換します。 このとき、opencvのデフォルトフォーマットがBGRなため、RGBに変換してリサイズしました。
推論する
global model, graph
graph = tf.get_default_graph()
model = tf.keras.models.load_model("./static/model/resnet_imagenet.h5")

...

with graph.as_default():
        pred = model.predict(np.expand_dims(img, axis=0))
        result_label = decode_predictions(pred, top=1)[0][0][1]
事前にresnet_imagenet.h5を作成しておき、それをファイル上部で読み込んでいます。 推論処理自体は、with graph.as_default() でグローバルで設定したTensorFlowのグラフにこのスレッドでのコンテキストを固定して、predict関数で推論しています。
今回はtf.kerasのResNet50を使っていることから、predictの結果をラベルに変換するdecode_predictionsを使って推論結果を取得しています。
他のモデルや自作モデルも、プロジェクトディレクトリのどこかに.h5ファイルを保存しておき、それをload_modelすることで、この実装のように使うことができるかと思います。
フロント実装
こちらを参考にさせていただきました。(ありがとうございます!)
<html>
<head>
    <meta http-qeuiv="Content-Type" content="text/html; charset=utf-8">
    <title>Fastapi 画像認識テスト</title>
    <script src="//code.jquery.com/jquery-2.2.3.min.js"></script>
    <script src="/static/js/post.js"></script>
</head>

<body>

<!-- ファイル選択ボタン -->
<div style="width: 500px">
  <form enctype="multipart/form-data" method="post">
    <input type="file" name="userfile" accept="image/*">
  </form>
</div>

<!-- 画像表示領域 -->
<canvas id="canvas" width="0" height="0"></canvas>

<!-- アップロード開始ボタン -->
<button class="btn btn-primary" id="post">投稿</button>
<br>
<h2 id="result"></h2>
</body>
</html>
// 画像をリサイズして、HTMLで表示する
$(function () {
  var file = null;
  var blob = null;
  const RESIZED_WIDTH = 300;
  const RESIZED_HEIGHT = 300;

  $("input[type=file]").change(function () {
    file = $(this).prop("files")[0];

    // ファイルチェック
    if (file.type != "image/jpeg" && file.type != "image/png") {
      file = null;
      blob = null;
      return;
    }

    var result = document.getElementById("result");
    result.innerHTML = "";

    // 画像をリサイズする
    var image = new Image();
    var reader = new FileReader();
    reader.onload = function (e) {
      image.onload = function () {
        var width, height;

        // 縦or横の長い方に合わせてリサイズする
        if (image.width > image.height) {
          var ratio = image.height / image.width;
          width = RESIZED_WIDTH;
          height = RESIZED_WIDTH * ratio;
        } else {
          var ratio = image.width / image.height;
          width = RESIZED_HEIGHT * ratio;
          height = RESIZED_HEIGHT;
        }

        var canvas = $("#canvas").attr("width", width).attr("height", height);
        var ctx = canvas[0].getContext("2d");
        ctx.clearRect(0, 0, width, height);
        ctx.drawImage(
          image,
          0,
          0,
          image.width,
          image.height,
          0,
          0,
          width,
          height
        );

        // canvasからbase64画像データを取得し、POST用のBlobを作成する
        var base64 = canvas.get(0).toDataURL("image/jpeg");
        var barr, bin, i, len;
        bin = atob(base64.split("base64,")[1]);
        len = bin.length;
        barr = new Uint8Array(len);
        i = 0;
        while (i < len) {
          barr[i] = bin.charCodeAt(i);
          i++;
        }
        blob = new Blob([barr], { type: "image/jpeg" });
        console.log(blob);
      };
      image.src = e.target.result;
    };
    reader.readAsDataURL(file);
  });

  // アップロード開始ボタンがクリックされたら
  $("#post").click(function () {
    if (!file || !blob) {
      return;
    }

    var name,
      fd = new FormData();
    fd.append("files", blob);

    // API宛にPOSTする
    $.ajax({
      url: "/api/image_recognition",
      type: "POST",
      dataType: "json",
      data: fd,
      processData: false,
      contentType: false,
    })
      .done(function (data, textStatus, jqXHR) {
          // 通信が成功した場合、結果を出力する
        var response = JSON.stringify(data);
        var response = JSON.parse(response);
        console.log(response);
        var result = document.getElementById("result");
        result.innerHTML = "この画像...「" + response["response"] + "」やんけ";
      })
      .fail(function (jqXHR, textStatus, errorThrown) {
          // 通信が失敗した場合、エラーメッセージを出力する
        var result = document.getElementById("result");
        result.innerHTML = "サーバーとの通信が失敗した...";
      });
  });
});
ajaxを使って画像認識APIへPOSTを行い、結果を表示しています。
動作確認
結果こんな感じに動くようになりました!

(フロントをもうちょっとオサレにしたかったのですが...)
おわりに
FastAPIのお勉強に画像認識APIを作ってみました。 今回作った実装がベストプラクティスではないと思いますが、動くものをつくることができてよかったかと思います。
今後どのフレームワークを使って仕事をするかわかりませんが、FastAPIは割と使いやすくてFlaskから乗り換えようかなぁと思いました。
最後となりますが、参考にさせていただいた皆様に感謝いたします!